Thursday, December 17, 2009

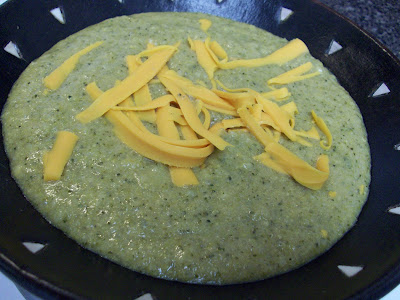
Broccoli Cheese Soup

This broccoli cheese soup is just the thing to have on a cold, rainy, movie-watching day. It's a super easy recipe to follow and it makes enough soup that you can graze on it all day (of course we're not saying this from personal experience or anything...). The original recipe (which we got from Skinny Bitch in the Kitch, by Rory Freedman and Kim Barnouin) says you can use either arrowroot or cornstarch to thicken the soup. The first time we made this we used cornstarch and it didn't turn out well. The cornstarch thickened too much into a kind of gloppy, sloppy mess. We use arrowroot now and it works really well. No glop. No ick. Broccoli cheese soup has always been a fav of ours and we absolutely love this recipe! Nom, nom :)


Broccoli Cheese Soup
1 Tbs coconut or canola oil
1 onion, diced
4 cups roughly chopped broccoli florets
2 tsp sea salt
1 tsp pepper
1 1/2 cups vegetable stock
4 cups soy or rice milk (I used almond milk once and it was good but the soup was not as thick and creamy)
1/4 cup arrowroot dissolved in 1/4 cup cold water*
6 ounces vegan cheddar cheese, grated (or regular cheddar if you're not vegan)

Heat the oil in a large pot over medium heat. Add the onion and cook, stirring occasionally, for a couple of minutes. Add the broccoli, salt and pepper and cook, stirring occasionally, for about 5 minutes. Add in the veggie stock and increase the heat to high and bring to a boil. Once boiling, reduce the heat to a simmer and cook for about 10 minutes till the broccoli is tender. Remove from the heat and add in 1 cup of the soy milk.

In batches, transfer the soup to a blender and blend until smooth and creamy (Use a hand held immersion blender instead if you have one). Transfer the soup back to the pot and turn the heat to medium-high. Add in the rest of the soy milk. Once the soup has returned to a simmer, add in the grated cheese and the arrowroot mixture. Stir until the cheese melts and serve!

Makes about 7 cups.


*Arrowroot is a starch extracted from the roots of the South American Arrowroot plant. Arrowroot is used as a natural thickener in many foods such as soups, sauces, and puddings. The arrowroot powder should be mixed with cold water before being added to a recipe, and it should be added towards the end, since overcooking can destroy the gelling properties of arrowroot making it kind of slimy instead. You can find arrowroot at most health and natural foods stores :)

Friday, December 11, 2009

Persimmon Bread

This is the first time Thomas and I have worked with persimmons and we find that we like them! We like their taste just by themselves and in bread they're fabulous! Before making this bread, my only memory concerning persimmons was when tragedy struck my mom's freshly baked persimmon loaf some years back. Our family puppy, Sligo, decided to undertake an impossible pooch mission by clamoring onto the kitchen counter and gulping down the entire loaf of persimmon bread in one sitting. Needless to say, he was not a happy puppy agent after that.

While wandering the farmer's market last weekend, Thomas and I spotted a batch of beautiful persimmons and decided that it was time to get acquainted with these little red and orange fruits (we were hoping that persimmons only attracted dogs and that our cats would not fall under the spell of persimmon seduction as well).


Persimmon Bread
1 1/4 cups persimmon, mashed pulp (about 5 persimmons)
1 Tbs lemon juice
2 Tbs canola oil
1/2 cup agave nectar
2 cups whole wheat pastry flour (regular whole wheat is fine too)
1 tsp baking powder
1/2 tsp baking soda
1/2 tsp ginger
1/2 tsp nutmeg
1/2 tsp salt
1/4 cup raisins
1/4 cup walnuts, chopped (optional)

Preheat the oven to 350 degrees. Oil a loaf pan.

To make the persimmon pulp, wash the persimmons under cold water and then cut off the tops. If the persimmons are soft enough you can peel off their skin with your fingers. If they are more firm use a vegetable peeler. If the persimmons have seeds, cut them out. Slice the persimmons into quarters and then blend them into a smooth pulp in the food processor or blender.


In a small bowl, mix together the persimmon pulp, lemon juice, oil, and agave. Set aside. In a large bowl, combine the remaining ingredients except for the raisins and nuts. Pour the wet mixture into the dry and stir until just combined, don't over stir. Gently fold in the raisins and nuts (if using). Pour the batter into the prepared loaf pan. Bake for 40-50 minutes till a toothpick comes out clean. Cool for 10 minutes in the pan. Then remove from the pan to a wire rack and cool the rest of the way. Wrap in plastic or foil and store in the fridge. The bread tastes even better the next day!

Makes 1 loaf.

You can turn this recipe into persimmon muffins too which we love! Use the same recipe as above except heat the oven to 375 degrees and bake them for 15-20 minutes. Line the muffin pan with paper liners. Makes 12 muffins!

Thursday, December 10, 2009

Sauteed Swiss Chard with Red Onions and Yams

Our Aunt Carolyn cooked this recipe for us when we visited her over Thanksgiving a year ago. Obviously it was so good that it stuck with us and we had to make it again! Don't worry if it looks like there is way too much Swiss chard. Add it to the skillet in batches as it will wilt down after a minute or so in the heat and make room for more. Also, you can use a butternut or acorn squash in the dish rather than a yam if you want :)


Sauteed Swiss Chard with Red Onions and Yams
2 tsp coconut or canola oil
1 small red onion, thinly sliced
1 yam or sweet potato, cubed
1/4 cup apple juice
1 bunch Swiss chard, coarsely chopped
sea salt to taste

In a large skillet, heat the oil over medium-high heat. Add the onion and cook, stirring often, till softened (about 5 minutes). Add the yam and apple juice. Cook, stirring occasionally, until the yam are soft. If the liquid dries up before the yam is soft, add a few tablespoons of water to the skillet. Add the Swiss chard, cover, and cook about 5 minutes or until the chard has wilted (may have to do in batches). Season with salt to taste and serve!

Serves 3 to 4.

Tuesday, December 8, 2009

Peanut Butter Cups

The holiday season means having some extra tasty treats around the house. These peanut butter cups help provide that little bit of extra Christmas cheer! They are super rich so Thomas and I have found that splitting one is the perfect way to be satisfied without getting that "oh my god I'm gonna be sick" sugar feeling. I was inspired to make these peanut butter cups after seeing them on a fellow food blog, http://www.loveveggiesandyoga.com/


Peanut Butter Cups
1 cup semi sweet chocolate chips (make sure it's vegan)
4 Tbs peanut butter (we like the Smart Balance kind)
1 Tbs nutritional yeast (for texture, flavor and nutrition)
1/2 tsp vanilla

Melt the chocolate in a double boiler or the microwave until it is smooth and creamy. In 4 paper muffin liners, pour just enough chocolate to cover the bottom of each liner. Put the liners in the fridge for just a minute to help harden this first layer of chocolate.

In a small bowl, combine the peanut butter, nutritional yeast and vanilla. Split this mixture between the 4 muffin liners and layer on top of the chocolate bottom. Pour the rest of the melted chocolate over the peanut butter layer and set the 4 peanut butter cups in the fridge until they are fully hardened. Once hardened they are ready to be eaten!

Makes 4.

Chili Lime Quinoa

Quinoa (pronounced Keen Wa) is an ancient seed that has been cultivated in places like Peru, Chile, and Bolivia for over 5,000 years. It was a staple in the diet of the Incas who considered it the "food of the gods." Today, it is most commonly thought of as a grain. However, quinoa is actually a relative of leafy green vegetables like spinach and Swiss chard. The health benefits of quinoa are numerous. It is extremely high in protein and contains all nine essential amino acids making it a complete protein like meat. It is also loaded with calcium. 1/2 cup of quinoa contains more calcium than a quart of milk. When cooked, it is slightly fluffy and creamy and has a nutty taste. Quinoa is becoming more and more popular in the U.S. today and you can find it in most well stocked grocery stores or health food stores (check the bulk section). This chili lime quinoa is extremely delicious and can be eaten as a main dish or as a side. Pictured with the quinoa is some freshly chopped Swiss Chard :)


Chili Lime Quinoa
1 cup uncooked quinoa
2 tsp canola oil
1 medium onion, chopped
1 (4 ounce) can diced green chilies
3 cloves garlic, minced
12 to 14 ounces vegetable stock
3/4 cup fresh cilantro, chopped
1/2 cup scallions, chopped
2 Tbs lime juice
1/4 tsp salt

In a dry skillet (no oil) toast the quinoa over medium heat, stirring often. This helps to bring out the flavor of the quinoa. After about 5 minutes the quinoa should become aromatic. Take it off the heat, transfer to a fine sieve and rinse with cold water.

In a large pot, heat the oil over medium-high heat. Add in the onion and cook for about 3 minutes. Add the chilies and garlic and cook for another minute. Add the quinoa and the vegetable stock and bring to a simmer over high heat. Once simmering, reduce the heat enough to maintain a gentle simmer. Cover and simmer without stirring for 20-25 minutes until the quinoa is soft, fluffy and most of the liquid has been absorbed.

Add in the cilantro, scallions, lime juice and salt. Mix gently and serve!

Serves about 6 (2/3 cup each).

Monday, December 7, 2009

Pad Thai

Pad Thai is one of Thailand's national dishes. Traditionally, it is a dish that consists of stir-fried rice noodles, eggs, an assortment of vegetables, with some occasional meat thrown in and covered in a light, spicy sauce. This dish was easy to put together and tastes extremely delicious!


Pad Thai
8 ounces rice stick noodles
1/4 cup agave nectar
1/4 cup mirin*
3 Tbs ketchup
3 Tbs tamari or soy sauce
1 1/2 Tbs lime juice
1 Tbs sriracha or another chili sauce
2 Tbs coconut or canola oil
14 to 16 ounces extra-firm tofu, drained, pressed and cut into small cubes
1/2 red onion, cut into 1/4-inch slices
3 cloves garlic, minced
3 scallions, halved lengthwise and cut into 2-inch pieces
2 cups fresh bean sprouts
1 carrot, shredded
1/4 cup fresh cilantro, chopped
1/4 cup roasted unsalted peanuts

To drain and press the tofu, place the tofu in a bowl with a paper or kitchen towel underneath. Take another towel and soak the water off the top of the tofu. Then take another dry towel and place it on top of the tofu with a bowl or can (anything with some weight)on top. Leave the tofu this way for about 15 minutes. With the water pressed out of it, the tofu will cook much better. After the tofu has been pressed, cut it into small cubes.

Fill a large pot about halfway with water and bring to a boil on the stove. Once boiling, put in the rice noodles for about 2-3 minutes. Rinse with cold water, drain and set the noodles aside.

In a small bowl, whisk together the agave, mirin, ketchup, tamari, lime juice, and sriracha. Set the sauce aside.

To bring out a stronger flavor in the peanuts, place them in a dry skillet (no oil or anything) and cook them on high heat for a few minutes until they begin to smell strong and flavorful. This will add to the overall flavor of the dish.

Heat the coconut or canola oil in a 12 to 14-inch wok or skillet over high heat. Add the tofu and cook for about 5 minutes. Add to the skillet the onion and the garlic and cook another minute or so. Add the rice noodles and sauce mixture and cook until everything is well coated in the sauce and heated through. Finally, add in the scallions, bean sprouts and carrots and cook until all the ingredients are well combined and hot. Transfer to plates and top with the cilantro and peanuts.

Serves 4 to 5.


*Mirin is a type of sweet rice wine that is often used in Asian cooking. You can usually find it in the foreign foods section of your grocery store or in an Asian market or health foods store.

Friday, December 4, 2009

Crumb Cake

Even with the lack of snow in SoCal, the holiday spirit has arrived at our house and the festive moods of Thomas and I can be seen around the living room as well as in our cooking. Our Christmas tree is up (which the kitties have terrorized already), a string of glowing blue lights has been placed around our big balcony window and we made crumb cake to go with our Rice Nog. We got the recipe for this crumb cake from Vegan Yum Yum.


Crumb Cake
-Crumb Topping-
8 Tbs margarine, melted (we used Earth Balance vegan margarine)
2/3 cup raw cane sugar
1 tsp molasses
3/4 tsp cinnamon
1 pinch of salt
1 3/4 cup whole wheat pastry flour

Whisk the still warm margarine together with the sugar, molasses, cinnamon, and salt. Add in the flour and mix with your hands to form a thick dough. Let it rest for 10 minutes while you prepare the cake.

-Cake-
1 1/4 cup whole wheat pastry flour
1/2 cup raw cane sugar
1/2 tsp baking powder
1/4 tsp salt
1/3 cup canola oil
1/3 cup soymilk + 1 tsp apple cider vinegar mixed together
1 Tbs cornstarch (mixed in 1/4 cup water)
2 tsp vanilla
some powdered sugar for dusting

Preheat the oven to 350 degrees. Line an 8x8" baking pan with lightly grease aluminum foil.

Whisk the flour, sugar, baking powder, and salt together. Add in the canola oil, soymilk mixture, cornstarch mixture and vanilla. Whisk until smooth but don't over mix. Pour into the prepared pan.

Break apart the crumb topping into pea-sized pieces with your fingers and spread it all over the cake batter. It will seem like too much crumb topping but don't be shy! Put it all on! It is a crumb cake after all.

Bake the cake for around 35-45 minutes or until the crumb topping is slightly brown and a toothpick stuck in the center comes out clean. Once the cake is done, lift it out of the pan by the foil and place it on a cooling rack for about 20 minutes. Dust with powdered sugar and serve!

Leftovers can be wrapped in plastic wrap or placed in a tupperware and kept at room temperature.

Serves 9.

Thursday, December 3, 2009

Tortilla Soup

We got the recipe for this tortilla soup from one of our local restaurants, Real Food Daily. Simply put, it is the most drool inspiring, tummy rumbling, and overall happiness inducing tortilla soup we have ever had. Beware, this soup has a bit of a nose running kick to it so if you want it less spicy simply take the seeds out of the jalapeño. We garnished the soup with homemade tortilla chips (recipe follows below) and cilantro. You can put whatever you want in the soup though! Here are some ideas: store bought tortilla chips, avocado, sour cream, and pico de gallo.


Tortilla Soup
1 Tbp canola oil
2 onions, coarsely chopped
3-4 cloves garlic, finely chopped
1 jalapeño chile, finely chopped
2 Tbs tamari or soy sauce
2 tsp ground cumin
2 tsp salt
1 tsp dried oregano
1/2 tsp pepper
8 cups vegetable stock
1 pound (approx 2 large) tomatoes, coarsely chopped
1/3 cup tomato paste
8 corn tortillas, coarsely chopped
1/4 cup fresh cilantro, finely chopped

Heat the oil in a heavy stockpot over medium heat. Add the onions and garlic and saute for 5 minutes. Add the jalapeño, tamari, cumin, salt, oregano, and pepper and saute for another minute or two. Stir in the veggie stock, tomatoes, and tomato paste. Cover and bring to a simmer over high heat. Decrease the heat to medium-low and simmer, stirring occasionally, for about 10 minutes. Add the tortillas and simmer another 10 minutes.

Blend the soup until smooth in the blender (do it in batches) or use a hand held immersion blender and blend the soup in the pot. Stir in the cilantro and garnish with tortilla chips or whatever you wish!

Serves 6 to 8.


Homemade Tortilla Chips
4 corn tortillas
1 Tbs canola oil
1 tsp chili powder
1/4 tsp salt

Preheat the oven to 350 degrees
Slice the tortillas into 1/8" thick pieces. Toss them in a bowl with the oil and spices. Then spread the tortillas out on a baking sheet and bake them for about 15 minutes or until they're slightly brown and crispy!

Makes about 1 1/2 cups.

Monday, November 30, 2009

Chocolate Chip Oat Cookies

I tried a couple of different dairy and egg free chocolate chip cookie recipes before I made this one and was satisfied. The egg replacement mixture in this recipe works wonders and gives the cookies the exact same texture as regular ones. While these cookies do offer nutrition (unlike Betty Crocker's sugar, fat, and ick laden ones)that doesn't mean you can down fist loads of them! Moderation my friends, moderation.


Chocolate Chip Oat Cookies
-Egg Mixture-
2 Tbs ground flaxseed
2 Tbs cornstarch
2 Tbs canola oil
4 Tbs boiling water
Mix these ingredients together in a small bowl. They should make a wet paste. Let the mixture sit for 10 minutes.

-Dry Ingredients-
2 1/4 cups whole wheat pastry flour (regular whole wheat is okay too)
1/2 tsp baking soda
1 1/2 tsp baking powder
3/4 tsp salt
1 cup quick-cooking oats
1 cup carob chips (semi-sweet chocolate chips work as well)
Mix these ingredients together in a medium bowl.

-Wet Ingredients-
1/4 cup canola oil
1/4 cup margarine, melted (we used Earth Balance vegan margarine)
3/4 cup raw cane sugar
1 cup brown sugar
1/4 cup soymilk
2 tsp vanilla
Mix together in a large bowl. Add the "egg" mixture and dry ingredients and mix well. Chill the dough in the fridge for 10-15 minutes.

Chill 2 non-stick, ungreased baking sheets in the freezer for a few minutes. It is important to have the baking sheets cold when the dough is placed on them.

Make the dough into golf ball sized balls and place on the baking sheets. Bake them in a 375 degree oven for 9-12 minutes. Let them cool for 5 minutes on the baking sheet before removing them.

Orzo Stuffed Peppers

We love these peppers. It's like Christmas morning when you open them up and see the treasure of gooey goodness that spills out. You can stuff the peppers with pretty much anything but we chose to do orzo (a rice-shaped pasta) here.


Orzo Stuffed Peppers
1 (28 ounce) can whole tomatoes
1 zucchini squash, grated
1 yellow squash, grated
2 large scallions, chopped
1/2 cup cheese, plus more for sprinkling, grated (we used vegan mozzarella but you can use anything. The original recipe calls for Romano)
1/4 cup extra-virgin olive oil
4 garlic cloves, minced
1 tsp salt
1 tsp pepper
4 cups vegetable broth
1 1/2 cups orzo (try and use whole wheat if you can)
6 sweet bell peppers (red, orange and yellow)
Basil for garnish (optional)

Preheat the oven to 400 degrees

Pour the tomatoes and their juices into a large bowl and break them into pieces with your fingers. Add the zucchini, yellow squash, scallions, cheese, olive oil, garlic, salt, and pepper. Stir to combine.

Bring the vegetable broth to a boil in a medium saucepan over high heat. Add the orzo and cook for 4 minutes. Drain the orzo through a sieve, reserving the broth. Stir in the orzo with the vegetables. Transfer the vegetable broth to a 9x13 baking pan.

Slice the tops off each pepper and with a spoon or your fingers remove all ribs and seeds. Cut a very thin slice from the base to help the peppers stand up.

Spoon the orzo mixture into the peppers. Place the peppers in the baking dish with the veggie broth. Cover with foil and bake for 45 minutes. Remove the foil, sprinkle each pepper with some cheese and continue baking until the cheese is golden, about 15 more minutes. You can garnish them with basil if you want.

Left-over peppers store well in a tupperware in the fridge. Reheat in the microwave!

Serves 6.

Tuesday, November 24, 2009

Jerk-Spiced Soy Jerky

This jerky was item #2 that I cooked for our Vegas trip. We were all a little
skeptical about the idea of jerky made from tofu but we were pleasantly surprised! It tasted really good and the consistency of the tofu was very similar to meat jerky. Be prepared however. This jerky takes nearly all day to cook in the oven. I didn't realize this when I started and ended up making the rest of my dishes for the trip around midnight. I got this recipe from Robin Robertson's 1,000 Vegan Recipes.


Jerk-Spiced Soy Jerky
2 tsp allspice
2 tsp dried thyme
1 tsp garlic powder
1 tsp sugar (I used raw cane sugar)
1/2 tsp black pepper
3 Tbs soy sauce or tamari
2 Tbs ketchup
1 Tbs maple syrup
1 Tbs extra virgin olive oil
1/2 tsp liquid smoke (I left this out as I'm not convinced liquid smoke is healthy)
1 (16-ounce) package extra-firm tofu

First you need to drain your tofu. To do this place the tofu in a bowl with some paper towels underneath it. Take more towels and soak the water from the top of the tofu. Then place a layer of dry towels on top of the tofu and place a couple of cans or bowls (anything somewhat heavy) on top and let the tofu drain for about 15 minutes. Once the tofu is drained, cut it into 1/4-inch thick strips.

In a small bowl, combine the allspice, thyme, garlic powder, sugar and pepper. Stir in the soy sauce, ketchup, maple syrup, olive oil, and liquid smoke (if using). Combine well.

Dip the tofu slices into the marinade to coat both sides. Place the marinated tofu on a non-stick baking sheet and refrigerate for 1 hour in order for the tofu to soak up the flavors of the marinade.

Place the oven rack in the lowest position of the oven. Preheat the oven to 200 degrees and bake the tofu for about 8 hours or until it is very firm and a deep reddish brown color. The jerky will keep in the fridge covered for about a week.

Serves 8.

Thin Crust Flaxseed Pizza

So last weekend my husband's company had their annual holiday party in Las Vegas. Needless to say, it was an awesome party filled with good friends and good dancing. In fact, I danced so hard that I about ruined my poor feet in my Target brand heels...guess I need to up the quality a bit. Anywho, before leaving for the weekend I found my inner boyscout and decided to prepare as much food as I could in advance to bring with us (I was a little unsure how healthy eating would fit into the city of sin). I knew that we would be staying in a hotel room with no microwave or any other form of heating food so I decided to make meals that would taste good cold. Surprise, surprise, pizza came to mind and let me tell you...it definitely hit the spot!


Thin Crust Flaxseed Pizza
2/3 cup warm water
2 Tbs agave or honey
4 1/2 tsp yeast
2 cups whole wheat pastry flour (regular whole wheat is fine too)
1/2 cup soy flour (gives the crust some good protein but you can replace it with regular wheat flour if you want)
4 Tbs ground flaxseed
1 tsp salt

Whisk together the water, agave (honey), and yeast in a small bowl. Let sit for 5 to 10 minutes or until the top gets foamy. In a large bowl, mix the rest of the ingredients together. Add the wet yeast mixture to the dry mixture and stir together as best you can. The dough will be dry and will mix hard. This is okay. Don't add water to it. Dump the dough out onto a counter top (doesn't need to be floured) and knead for about 5 minutes or until the dough is a smooth round ball. Place the dough in a lightly greased bowl and cover with a clean towel. Let it rise in a warm place for at least 30 minutes.

After the dough has risen, knead it for a minute or so on a floured counter top. Split the dough into two balls and roll each ball out and place on a non-stick pizza pan or stone.

We like to vary our pizza toppings. However, the pizza pictured here has marinara sauce, onions, red and green bell peppers, some cilantro, and Follow Your Heart Mozzarella Soy Cheese on it. Feel free to top your pizza with whatever you want!

Bake the pizza in a 425 degree oven for 10 to 15 minutes.

Makes 2 pizzas.

Tuesday, November 17, 2009

3-Ingredient Savory Sauce

One of our friends from Illinois, Tria, gave us the recipe for this amazingly yummy and healthful savory sauce. This sauce can be drizzled over rice, vegetables, tofu, tempeh, and yes, meat too! Our favorite way to eat it is to pour it over a big bowl of steaming rice and vegetables. Other than the wonderful taste, I love this sauce because it is powerfully nutritious. Each of the 3 ingredients found in this sauce, flaxseed oil, nutritional yeast, and Braggs liquid aminos, is a food that we should all be incorporating into our eating routine everyday. Alone, these ingredients might be a catastrophe of bad taste and poor spirits followed by a solemn vow to love every bite of that Mickey D's Happy Meal, but joined together these ingredients taste like pure love.


3-Ingredient Savory Sauce
1/3 cup nutritional yeast
1/3 cup flaxseed oil (organic is always best)
1/3 cup Braggs liquid aminos

Whisk all of the ingredients together. Store in a jar or in any other covered container in the fridge. The sauce will last for a good month or more. You may have to whisk it each time before you use it as it will separate in the fridge.

Makes 1 cup.

Friday, November 13, 2009

Check Out Healthy Hints!

Thomas, my husband, just started another blog called Healthy Hints. It partners well with Healthy Noms in that it explains many of the things we have been learning about having a balanced, healthy, and long life through fitness and nutrition. There is a link to it in my Healthy Links section, or click here www.healthy-hints.blogspot.com Check it out!!

Agave Dijon Salad Dressing

Okay, so this is probably one of the best salad dressings I've ever had. It livens up even the most boring and pathetic of salads! We got this recipe from Skinny Bitch in the Kitch and its pretty much a staple in our fridge now.


Agave Dijon Salad Dressing
1/4 cup agave nectar
1/4 cup Dijon mustard
2/3 cup extra virgin olive oil
1/4 cup red wine vinegar or balsamic vinegar
2 cloves garlic, minced
1/2 tsp salt
1/2 tsp pepper

Whisk all of the ingredients together in a small bowl. The dressing will last for up to a month covered in the fridge.

Makes about 1 1/2 cups.

Note: The dressing can harden and separate in the fridge. Let it warm to room temperature and stir before serving.

Thursday, November 12, 2009

Chana Masala and Curried Naan

So last night I figured I would attempt to make one of my great loves, Indian food. A lot of Indian food naturally falls into the category of healthy noms so it won't be hard to implement this cuisine into our lifestyle. Chana Masala is curried garbanzo beans and naan is a type of Indian flat bread. Traditionally, naan is cooked in a tandoor oven. However, since we have nothing that even slightly resembles a tandoor oven in our western apartment kitchen, I cooked the naan in a simple skillet. Though the naan could have been prettier (as you will see in the pictures) it tasted really good! The chana masala was great too, though I think I could have made it even spicier. The best way to eat chana masala and naan is to dip the naan in the curry. You can serve the curry over steamed brown rice too if you want :)


Chana Masala
1 yellow onion, finely diced
4 cloves garlic, minced
2 jalapeño peppers, seeded and diced
2 cans garbanzo beans, drained and rinsed
14 oz can diced tomatoes (try and get 'no salt added' if you can)
5 small red potatoes, diced (leave the skins on)
4 cups vegetable broth
1/2 tsp coriander
1/2 tsp ginger
1/2 tsp dry mustard
1 tsp chili powder
1 tsp salt
1 tsp pepper
1 tsp cumin
1 1/2 Tbs curry powder
1/2 tsp garlic granules
1 bay leaf
1/4 tsp basil
1/4 tsp oregano
1/4 tsp paprika
1/4 tsp tumeric
1 tsp tandoori paste
1/4 cup fresh cilantro plus 2 tablespoons reserved for topping, chopped
1 Tbs arrowroot or cornstarch, mixed with an equal amount of water

Heat a tablespoon of coconut or canola oil in a 1 or 2 quart pot. Add onion and cook for 2-3 minutes on medium-high heat. Add garlic and jalapeño and cook for a few more minutes. Take off the heat and add in the beans, potatoes, tomatoes, stock, herbs and spices. Place back on the heat, get it to a simmer and then let simmer, covered, on medium-low until the potatoes are soft and a lot of the liquid has cooked off. Mash the curry with a potato masher to break up the big pieces. Add in the arrowroot or cornstarch mixture (this will thicken the curry). Take off the heat and sprinkle with the reserved cilantro. Serve with naan or rice!

Serves about 6.


Curried Naan
scant 4 cups of whole wheat pastry flour or bread flour
1 1/2 tsp salt
1 Tbs olive oil
2 Tbs curry powder
1 Tbs dry yeast
1 1/4 cups water
1/2 cup raisins
3 Tbs mango chutney

Put the flour, salt, oil, curry powder, yeast, and water into a bowl and mix for about 2 minutes. Then tip the dough out onto a floured counter top and knead for 5 minutes or until soft and pliable. Place the dough in a lightly greased bowl, cover with a clean cloth and let rise for 30 minutes.


Line a baking sheet with parchment paper. Knead the raisins and mango chutney into the dough. Then divide the dough into six pieces and place them on the baking sheet. Let the dough rest for 1 hour.


On a floured counter top, roll each piece of dough out into approx an eight-inch circle or oval. Let rest for another 5 minutes. In a large frying pan, heat some coconut or canola oil until very hot. Shallow-fry each naan on high heat until it is browned on both sides.

Makes 6 naan.

This recipe is from Paul Hollywood's 100 Great Breads cookbook

Tuesday, November 10, 2009

Autumn Spice Cake

Though it is cooler, Southern Cali doesn't embrace Autumn like our home state of Colorado. There are no changing leaves, frosty mornings, or first snows. Therefore, Thomas and I have taken it upon ourselves to create what Autumn ambiance we can on our own. The festive spices and dried fruit in this spice cake definitely add to our Autumn mood. In fact, I think I might go don my scarf and wool mittens right now! Oh wait, its 70 degrees outside. And I'm sweating. Never mind.


Autumn Spice Cake
1 cup sugar (we used raw cane sugar)
1/2 cup margarine (we used Earth Balance vegan margarine but any will do!)
1 tsp vanilla
1 cup dried fruit (we used raisins)
1 1/2 cup unsweetened applesauce
2 tsp cinnamon
1 tsp nutmeg
1 tsp cloves
1 1/2 tsp baking soda
2 cup whole wheat pastry flour (regular whole wheat is fine too)
1/4 cup sliced almonds (optional)

Preheat the oven to 350 degrees
Cream the sugar and margarine together in a large bowl. In a separate bowl, combine the vanilla, applesauce, spices and baking soda. Add the applesauce mixture to the margarine/sugar mixture. Slowly add in the flour and stir. Fold in the dried fruit. Place the batter in a greased 9x13-inch pan and sprinkle the almonds on top if using. Bake for 20-25 minutes until top is golden and slightly spongy!

Monday, November 9, 2009

Quick and Yummy Chocolate Mousse

Thomas and I were craving chocolate the other night (big surprise) and decided to whip up this amazingly yummy chocolate mousse. There are only 3 ingredients in this dish and it is not only good, but good for you!


Chocolate Mousse
2 ripe avocados
1/2 cup agave nectar*
1/4 cup unsweetened cocoa powder
dash of vanilla (optional)

Place all of the ingredients in the food processor or blender and blend together until thick, smooth and creamy! You can eat it straight out of the blender or you can chill it in the fridge for a cool, rich texture.

Serves about 4.


*Note: Agave nectar is a sweetener like honey only more mild. It has a low glycemic index (meaning good for you, way better than processed, white sugar)and can be substituted for sugar in most recipes. The agave plant is the same plant that tequila is produced from and is found mostly in Mexico. You can find agave with the honey in most super markets!

Friday, November 6, 2009

Jalapeño Poppers and Acorn Squash

Okay, so I admit it. My mouth was on fire last night. In fact, I had to do multiple high speed circuits around the living room with a half piece of frozen bread shoved into my mouth before I could get the flames out. I guess I shouldn't have been surprised considering I was shoving jalapeños into my mouth. I'll not lie though. I loved the jalapeño poppers. They were absolutely delicious and the gooey cheeze that we made to stuff them was amazing. Next time, Thomas and I will know NOT to add the seeds of the jalapeños to the cheeze sauce to make it hotter. Believe me, its hot enough as it is. Thomas is the one who did all the cooking last night! I was simply his lowly sues chef. Along with the Poppers, he made yummy sugar glazed acorn squash and some salad. Overall, it was a great meal. Except...oh yeah, all the soymilk is gone...that's right...we guzzled it all in our frantic burning states of hell.


The original recipe for the Poppers (which we got from www.myveggiekitchen.blogspot.com)said for us to deep fry the poppers. Well, Thomas and I don't feel there's a need to deep fry anything. So, we baked 'em. And guess what? They turned out just as wonderfully golden, crispy and crunchy as if we had fried them!

Jalapeño Poppers
15 jalapeño peppers, with stems
the recipe for gooey cheeze sauce (below)
10 cloves of garlic, chopped
1 cup soymilk
1 cup flour (we used whole wheat pastry flour)
1 cup whole wheat bread crumbs

To prepare the jalapeños, cut a slit down the length of each pepper with a paring knife. Then cut the seed pod at the top of the pepper under the stem. The seeds should be freed now so take the knife and scrape them out along with the pith. Mix the garlic in with the cheeze sauce (along with the seeds if you want it really hot!) Take a ziplock bag and snip a small hole in one corner of it to form a pastry bag. Pour the cheeze in the bag and then funnel it through the hole and into the slitted peppers.


Dip each Popper into the soymilk and then dip it into the flour. Let them sit for about 10 minutes like this until the flour hardens some.


Then dip each Popper once more into the soymilk but this time instead of flour, dip them into the bread crumbs. Let them sit for another 10 minutes.


Lightly oil a baking sheet to put them on. Preheat the oven to 400 degrees and bake them for about 30 minutes!

Gooey Cheeze Sauce
3/4 cup chickpeas, drained and rinsed
1/2 cup raw, unsalted cashews
2 oz pimiento peppers, diced
1/4 cup water
2 Tbsp. nutritional yeast
2 tsp. yellow miso
2 Tbsp. butter, melted (we use Earth Balance butter but regular is fine too!)
1/2 tsp salt, more to taste
2 Tbsp. lemon juice

Place all of the ingredients in the blender and blend. Then blend some more until it is thick and creamy.


Makes 15 jalapeño poppers.

Acorn Squash
2 acorn squash
some butter (vegan or not)
some brown sugar or raw cane sugar

Cut each squash in half and dig out all the seeds with a spoon. Lightly spread around some butter on the inside of each half. Then sprinkle on some sugar. Place on a baking sheet face down. Preheat the oven to 400 degrees and bake them for about 30 minutes until they are soft.

Serves 4.

Thursday, November 5, 2009

Teriyaki Tofu

Welcome to my first post! Last night I embraced the Asian side of myself (which is purely in heart since I'm mostly Irish)and made teriyaki tofu with steamed brown rice and vegetables. I'm drooling all over myself just thinking about it. It tasted better than any teriyaki tofu I've eaten in a restaurant and made being healthy not only easy, but incredibly lip smackable. I got the recipe from fellow foodie blogger, www.myveggiekitchen.blogspot.com Below is a picture of my final result. Yum! (Sorry, I'm no professional photographer, though I like to pretend).


Teriyaki Tofu
14 oz. firm tofu, drained
3 Tbs. cornstarch
2 Tbs. canola or peanut oil
1 tsp. sesame oil
1/2 recipe of teriyaki sauce (below)

Cut tofu into 1/2 inch cubes and place in a ziplock bag with the cornstarch. Seal and shake to coat. Heat the oil in a large skillet over medium-high heat. When hot, add the tofu, turning only when sides are browned. Once browned, pour in the teriyaki sauce and stir to combine. It will thicken in the heat.

Teriyaki Sauce
1 Tbs. cornstarch
1/2 cup sugar (I use raw cane sugar or sucanant to be more healthy)
1/2 cup tamari or soy sauce
1/4 cup apple cider vinegar
1 clove garlic, minced
1 tsp. ginger, minced
1/4 tsp. freshly ground black pepper

Place all the ingredients in a medium pot. Over low heat, whisk the ingredients together and simmer until the sauce thickens and bubbles!

I use the other half of the sauce on vegetables. Simply place the veggies in a skillet with a little bit of oil and saute them over high heat until soft. Pour in the teriyaki sauce and stir until it thickens (only a few minutes).

Serve the teriyaki tofu and veggies over steamed brown rice!
Recipe serves about 4